It's been a rainy Spring here in California, but we are NOT DISCOURAGED, faithful farmers! It has only given us time to get ultra-prepared for Summer gardening and get all of our tools sharpened, shiny and in gleaming shape. Yes, I did say sharpened. Does anyone ever think of sharpening their shovel? Well, we had to dig a ditch for some irrigation this weekend, and I can assure you this: The woman with the sharper shovel digs the deeper ditch.
What you will need: A flat bastard. I had to say that. I just had to!! (Did you know that's the name for a flat file?? I learned this from a man I know who has lots of tools). Actually any around-8-inch file will do, with a handle to protect your fingers. You'll also need som WD40 and some sandpaper.
How to sharpen your shovel: Are you excited? Doesn't it make you feel buff and outdoorsy to say "I'm about to sharpen my shovel." Ok, here goes. First, remove any rust with steel wool or a wire brush. Then find a way to clamp your shovel so the business end is in a position for easy filing. With a shovel this means you want the inside of the shovel UP. Then, take your file and place it at a 45 degree angle and make long, wide strokes, trying to cover about half the shovel each time. Only move in one direction. Don't dwell too long in one place. Keep your strokes even and long. Then switch sides. Go to town, brother! When you are done sharpening, turn the shovel over and notice the burr on the back of the shovel blade. This is the evidence of your shovel-sharpening prowess. Sand off the burr with sandpaper. Lastly, oil down that baby with some WD40 and you are ready to dig.
For your hands: While you're at it, and you've got the sandpaper out, sand the handle of your shovel too. It'd be a shame to slice through that butter-soft soil, only to get a nasty splinter.
Happy digging! Get those trees planted and the irrigation pipes in the ground.
I don't know what it's like in your part of the world, but in California we've seen quite a bit of the March lion and not much of the lamb. Soups and stews are still a staple in my kitchen; radishes, peas and spring lettuces still wistfully far away. But as Crosby, Stills and Nash say: If you can't be with the one you love, well then, love the one you're with." So folks, I'm here to say, give some love to your soup and stew recipes, imbue them with creativity, and create some good mojo. Tammie and I are here to help you with our two favorite chili recipes. Try them. Tell us what you think. Then post your own for us to try.
TAMMIE'S TURKEY CHILI
(I just want to endorse this recipe by saying that there's sometimes a batch in the fridge at work which Tammie so generously shares with our hungry staff. I like it with Red Rooster hot sauce!)
1 lb Ground Turkey
1 onion
2-3 Cloves Garlic
2 Tbsp Olive Oil
2 15oz Can Mexican Stewed Tomatoes
1 15oz Can Red Kidney Beans
3 Tbsp Each Spices
Garlic Powder
Chili Powder
Paprika
White Pepper
1 Tbsp Ground Red Pepper-You can use less or more depending on desired heat
Salt & Black pepper to taste
Brown onions & garlic in olive oil.
Add ground Turkey and brown-add salt and black pepper while browning
Put stewed tomatoes in food processor and puree
Once ground turkey is browned, add stewed tomatoes and spices
Turn down heat and simmer for about 30 minutes
Add Kidney beans and heat through.
AUNTIE ENGLISH'S ANCHO CHILI COLORADO
(this chili is more like a stew, has no beans, and can be eaten with tortillas, cilantro and chopped onion)
1 pork shoulder, bone in or out, doesn't matter
1 bag dried Ancho chilis (or Poblano, it's the same thing)
3 T toasted sesame seeds
One onion, sliced thickly.
5 cloves fresh garlic
optional-1 oz. unsweetened chocolate
1-2 quarts chicken broth
olive oil
limes
1. Toast whole dried chilis lightly in a dry cast iron skillet. When lightly browned, soak in boiling water till soft.
2. Saute onion and garlic cloves together in olive oil till soft.
3. Put soaked chilis, onions, garlic, toasted sesame seeds, optional chocolate, spices and about a half cup of the chili-soaking water in a blender. Blend well. This is your sauce. Add salt, pepper, and lime juice to taste. The lime juice gives this sauce some acid and a little zing.
4. Take the pork shoulder, trim excess fat, and cut into big chunks. A 3x3 inch chunk is about right, but it really doesn't matter because it's all going to fall apart into a meltingly tender stew.
5. Brown the pork in olive oil till lightly crisp and brown on all sides.
6. Put browned meet into a crock pot or big dutch oven and cover with the chili sauce. Pour over enough chicken broth to cover the all the pieces of meat. Bring to a slight bubble, then simmer on low for 3-4 hours.The mean will fall apart when a fork is inserted. Serve with tortillas, cilantro, sour cream and onions. I also like shredded cabbage with mine.
Wow. Did you know this? Saturday is St. Vincent's Day. I read about this holiday in my Farmer's Almanac, and I'm pretty convinced it's a day we would enjoy celebrating here at Home Grown Farms. Are you ready for this? St. Vincent is the patron saint of winemakers and drunkards. That's right, drunkards. How you get to be a saint by sponsoring drunkards is something I'd like to know, but that's a conversation that will have to be taken up with bigger powers outside of this blog. But wait, there's more--apparently, on this day, the 22nd of January, NO VINES SHOULD BE PRUNED. Alright! We're down with that, Tammie and I. . . . Certainly this rule is extended to all winery workers, in the vineyard or not. . .aye? "BY THE LAW OF ST VINCENT, NO WORK IN THE WINERY SHALL BE DONE ON JAN 22." Because we need time to laud the winemakers and drunkards. Amen to that.
(St. Vincent looks a little mischievous in this icon, doesn't he? with that grin and the thumbs up?)
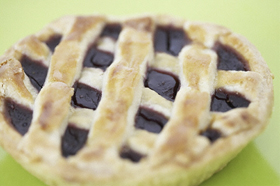
Ok, let's take a vote. Who's favorite part of the pie is the crust? Both flaky crust and fresh filling are vital to a homemade pie . But how many times have I heard someone say "the crust makes the pie"?? So readers, why do you buy those yucky store-bought crusts and put your hand-worked homemade filling into them?! They don't deserve it. Is it because you can't bear to see how much butter actually goes into a pie crust? Face it, there's more butter than flour. That's what makes it good.
Please. Making pie crust is easy. And quick. And some would even say fun. Just do it. Here's my best and easiest recipe. And honor your pie by using real butter for goodness sakes!
Put into the bowl of a food processor:
1 stick of VERY COLD unsalted butter, cut into tablespoon sized chunks.
3/4 cup flour.
pinch salt.
PULSE. That's right. Pulse. Don't turn your machine on and walk away. The goal here is to ever so slightly blend the butter with the flour until it starts clumping. Add a few drops of ice water. Pulse. Another few drops, pulse. Keep doing this until you have something that looks like floury white pebbles. Pour the mixture into a metal bowl and mush it all together so it sticks into a rough ball. Refrigerate one hour. After one hour, take out your dough, flour your surface, and roll it into your desired crust shape. Don't over shape or over roll. Underworking keeps the butter pockets big and tender, making your crust oh so flaky and light!
Do you have favorite pie tips or recipes? Tell me tell me! I love pie. Right now I am in search of a great KEY LIME PIE recipe.


